


If you’ve recently purchased or received a Windows 11 computer, one of the first things I recommend you do is to add fingerprint authentication as one of your sign-in options. This provides your computer or laptop with an additional layer of security and makes the login process much faster than a regular password.
While Windows machines can vary in how fingerprint authentication is implemented, setting up fingerprint logins is more or less consistent across all computers running Windows 11.
In this article, I will show you how to add fingerprint authentication to your Windows 11 computer, answer some frequently asked questions, and provide a few benefits of fingerprint unlock for your machine.
How can I set up fingerprint recognition on Windows 11?
Before we begin, I must mention that this tutorial applies to laptops or computers with access to a fingerprint sensor. These days, many consumer and business laptops already include a fingerprint sensor built into the device itself.
For those without a sensor, there are a variety of USB fingerprint sensors that can be purchased as a separate add-on. These sensors plug into your laptop’s USB ports and add fingerprint functionality without adding much bulk to your machine.
With that out of the way, let’s begin setting up fingerprint recognition on your Windows 11 computer.
1. Go to the Windows 11 Settings app.
The first step in enabling fingerprint authentication is to access the Settings app within Windows 11.
There are many ways to access the Windows Settings app. Personally, I feel the fastest way is to press the Windows Key on your keyboard and start typing “settings.” This will automatically pull up the Settings app on your Start menu.

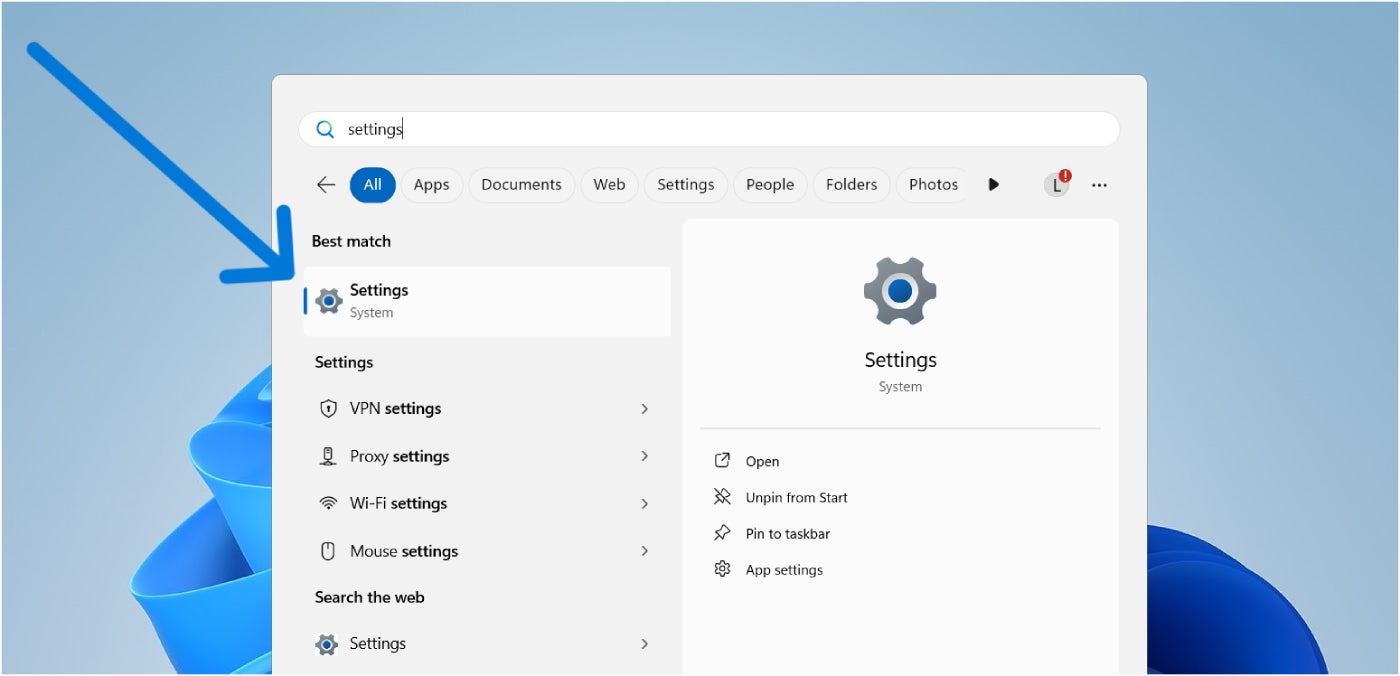
You can also access the Settings app by going to the Start menu and navigating through your apps. The Settings app will typically be found at the bottom of the list, as apps are organized in alphabetical order by default.
2. Navigate to the Accounts menu from the sidebar.
Once you’ve opened your Settings app, look to the sidebar at the left and select the Accounts menu.

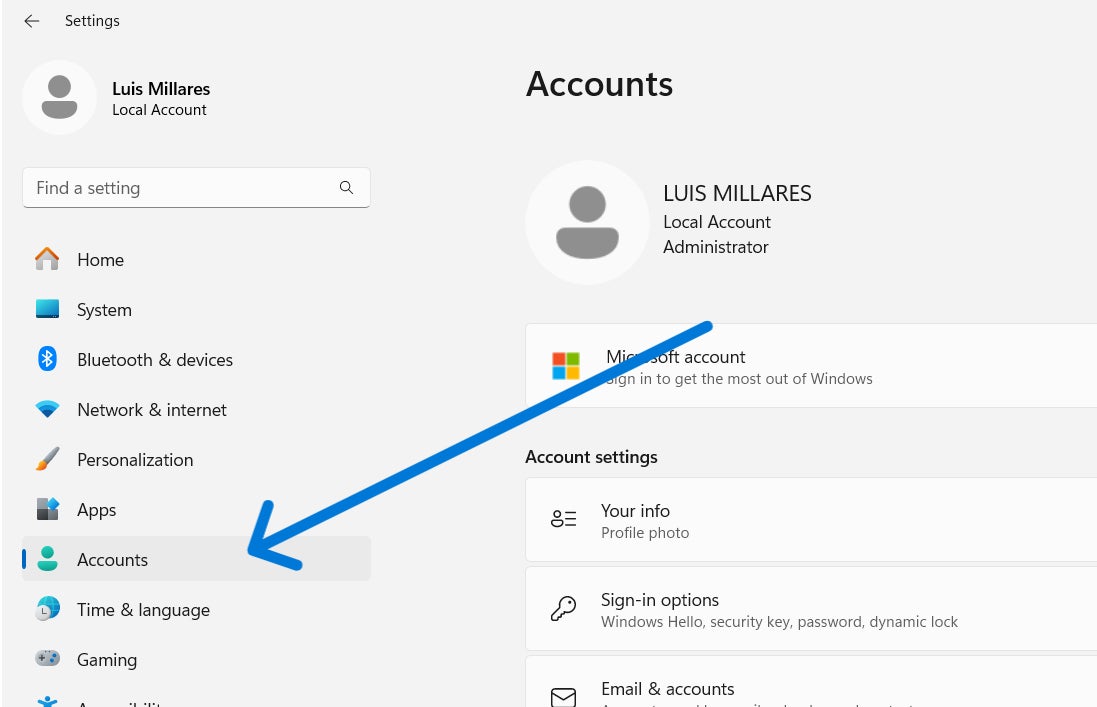
The Accounts menu houses all configurations regarding accounts on your Windows 11 computer. This includes your personal info, email and accounts, device access, and the like.
It also features all settings related to Sign-in options — which is our next step.
3. Click Sign-in options.
From the Accounts menu, select Sign-in options. This menu contains all the possible methods to sign in to your device.

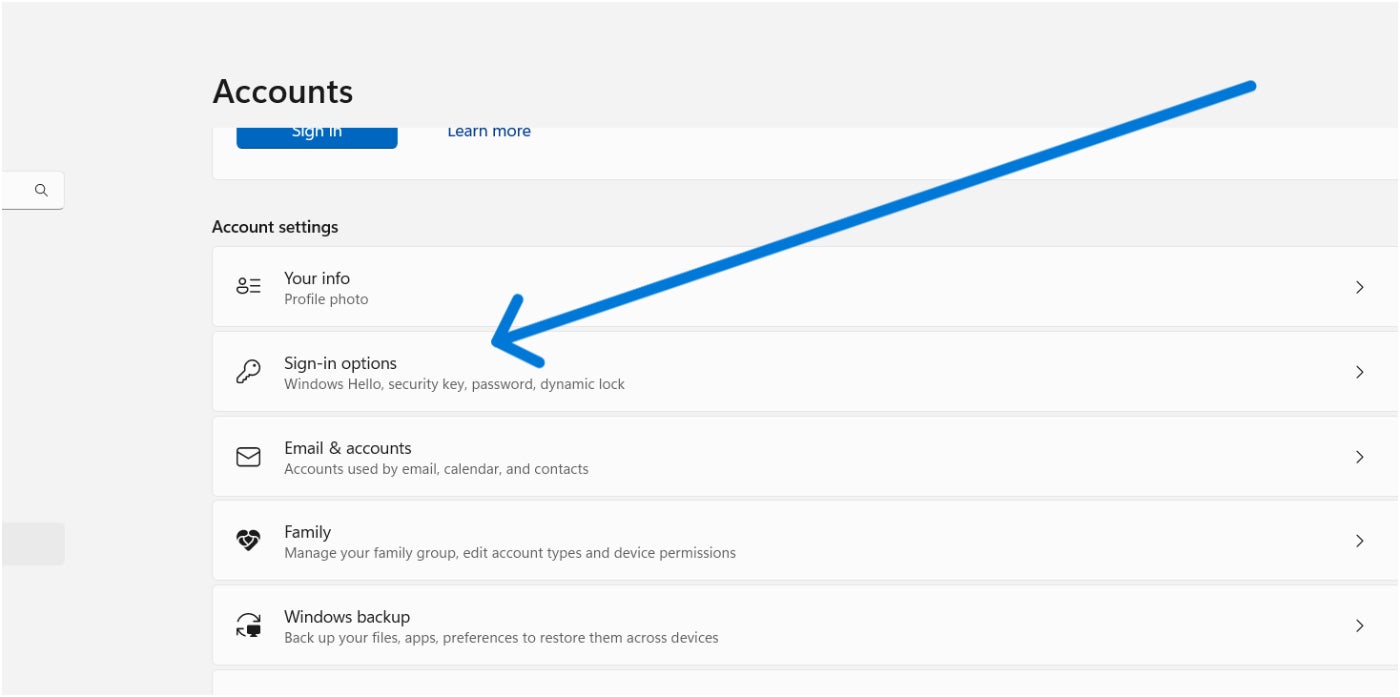
The usual sign-in methods found here are sign-in via password, PIN, and security key. If your laptop or computer supports it, this is also where you’ll find Windows Hello, with the option to sign in using either facial or fingerprint recognition.
Windows Hello is the main biometric authentication feature included in the Microsoft Windows operating system since 2015. First introduced in Windows 10, it’s now the primary way to add fingerprints in Windows 11.
4. Select Fingerprint recognition (Windows Hello) and “Set up.”
From the Sign-in options, we can now select Fingerprint recognition using Windows Hello. When you click Fingerprint Recognition, a “Set up” button will appear.


Select the Set up button, and the process for inputting your fingerprint will start. First, Windows will ask you to provide your PIN or ask you to make one if you don’t already have one set up.

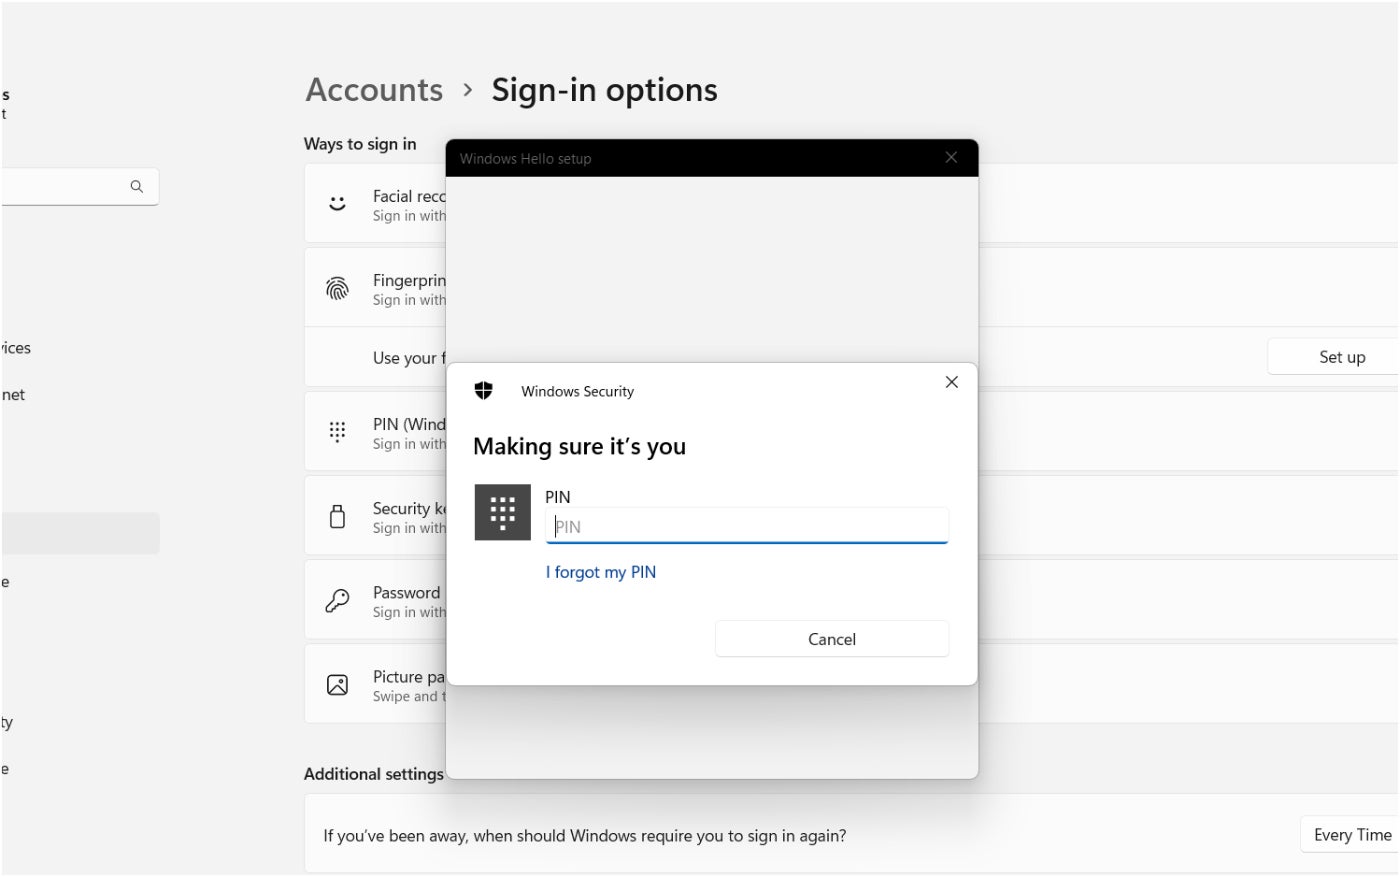
It’s important to remember your PIN as it serves as your backup authentication if your fingerprint isn’t read properly. After a set number of failed fingerprint attempts, Windows 11 will ask for your PIN instead, allowing you to log in when there’s a glitch with your fingerprint sensor or if you cannot use that method at certain times.
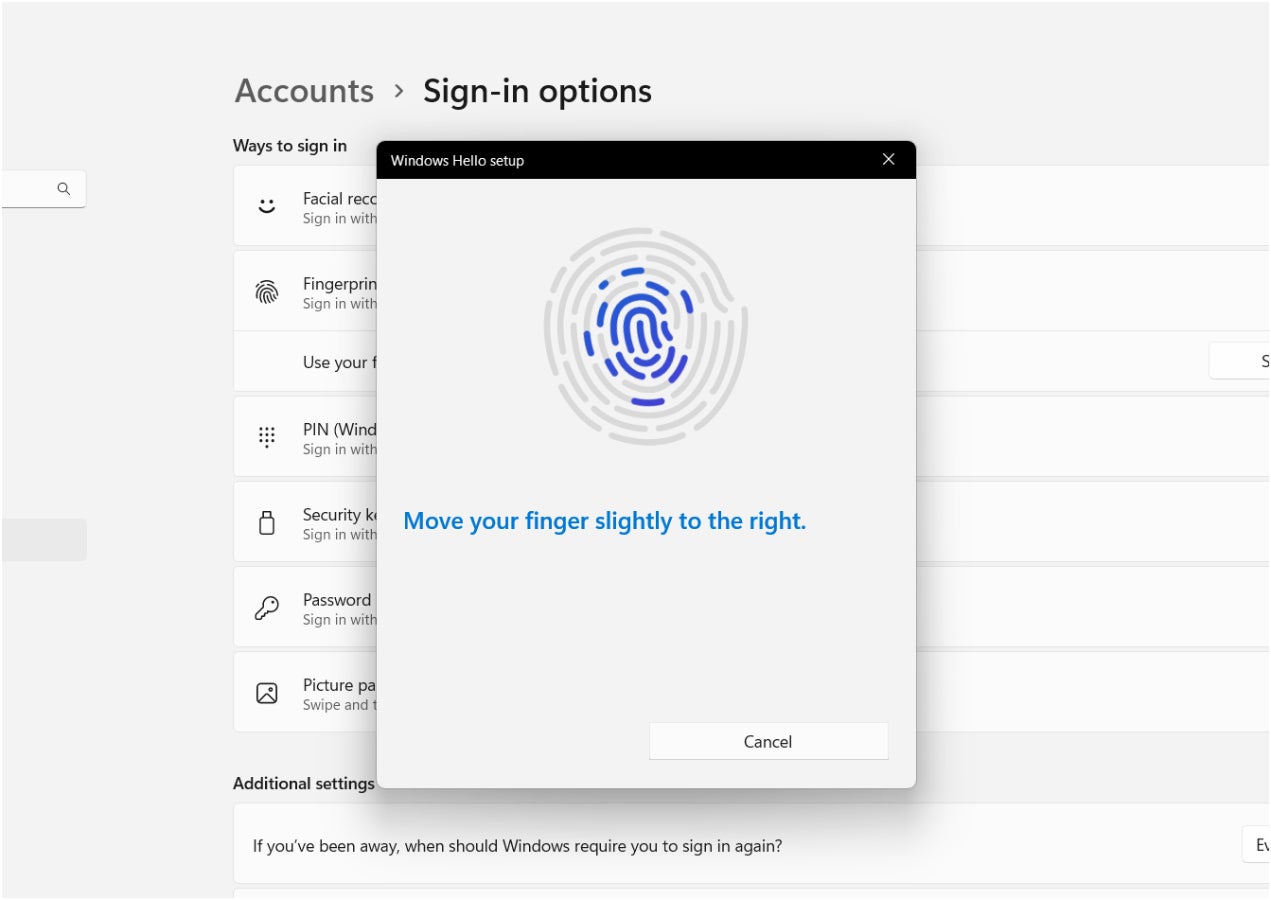
Once you’ve added your PIN, Windows Hello will ask you to contact your device’s fingerprint sensor and add your biometric data to the system.

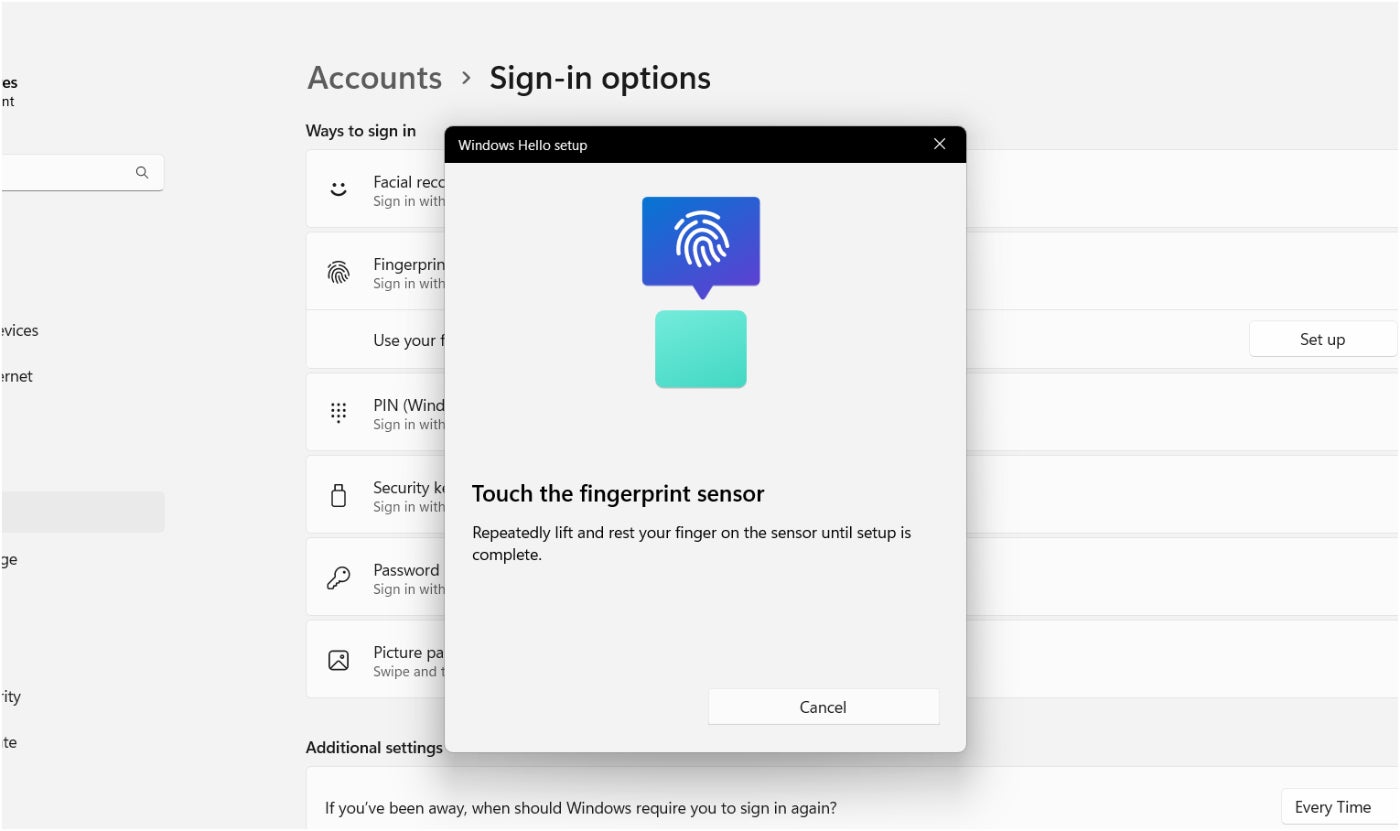
Expect that Windows Hello will instruct you to touch the fingerprint sensor multiple times with different areas of your fingerprint. This is so it can get an accurate print reading and enable you to sign in with your fingerprint at various angles.

Once you’ve completed the necessary amount of fingerprint inputs, Windows Hello will inform you that your fingerprint was successfully added, and you’re done!

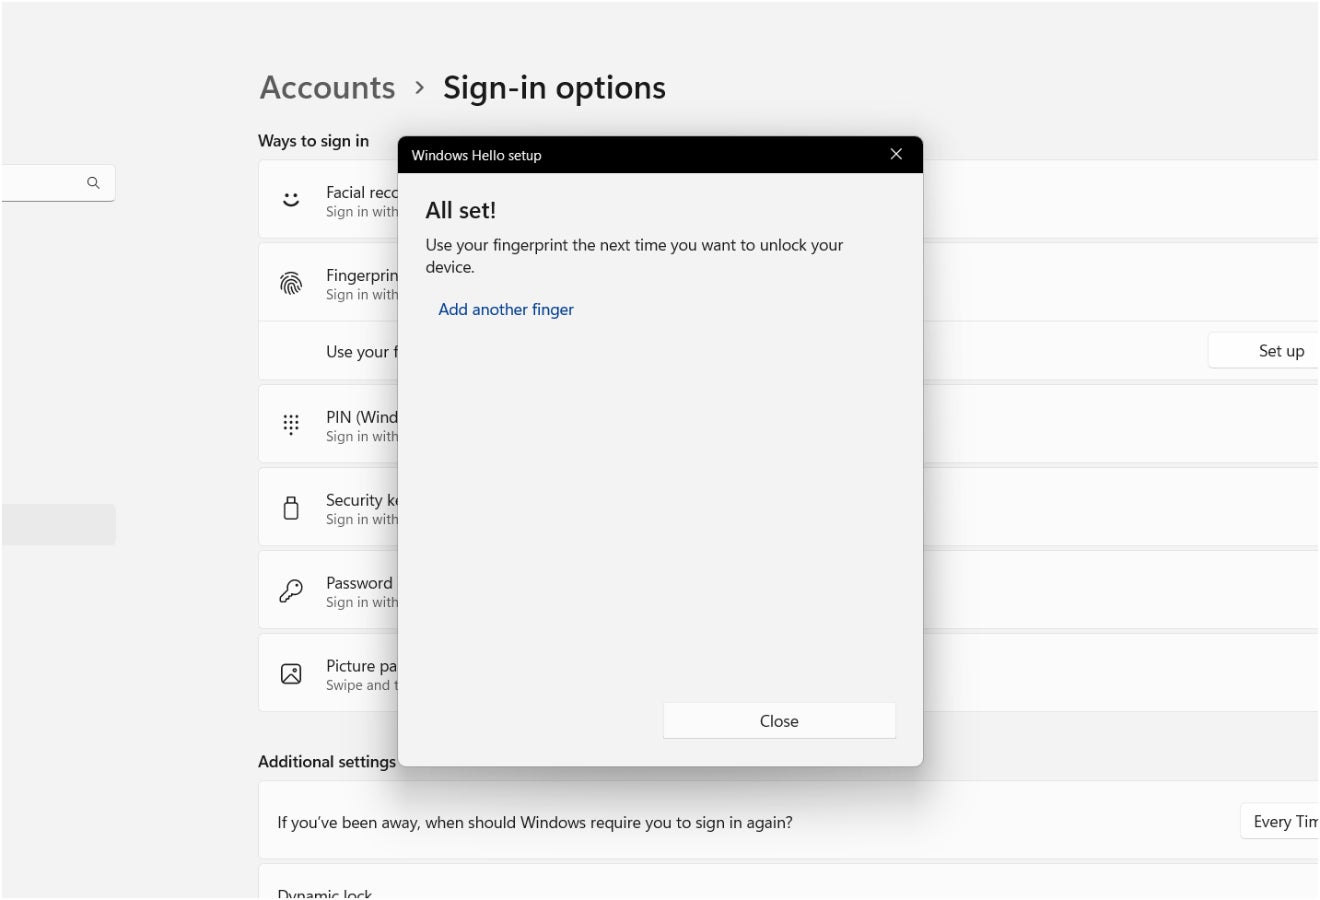
You can now sign in to your laptop or desktop computer via fingerprint authentication.
Frequently asked questions about Windows 11 fingerprint log-in
Can I use multiple fingerprints to log in to Windows 11?
Yes, Windows 11 lets you add multiple fingerprints to log into your computer. In practice, this means you can have both your right and left index fingerprints as a means to unlock your computer.
If you’re wondering if there’s a maximum number of fingerprints for Windows Hello, some Microsoft support pages have said that there is a limit of 10 fingerprints for 10 different accounts. That being said, I don’t think the average user will have any issues in adding as many fingerprints as they want.
Is fingerprint sign-in secure on Windows 11?
Yes, fingerprint authentication is secure on Windows 11. This is especially true since your biometric data is uniquely yours and will be extremely hard for threat actors to replicate or hack.
This is in comparison to regular passwords or PINs, which can be susceptible to brute force attacks, phishing, dictionary attacks, or credential stuffing.
What if I don’t have a fingerprint reader?
If your laptop or computer doesn’t have a fingerprint reader, don’t worry. You can easily purchase external fingerprint readers that plug into your device via USB, which add more or less the same fingerprint capabilities than those that come built-in.
Per my research, these types of fingerprint readers range from around $15 to $30, depending on the brand. Before purchasing one, though, I highly recommend looking through customer reviews to see if they work well with Windows 11 and Windows Hello.
Since these are third-party readers and aren’t proprietary to your Windows 11 machine, performance may vary.
SEE: Securing Linux Policy (TechRepublic Premium)
What happens if my fingerprint doesn’t work on Windows 11?
In instances where your fingerprint doesn’t work, Windows 11 will ask for your PIN as a secondary means of authentication. This is why Windows 11 requires both a PIN and your fingerprint/facial data whenever you use Windows Hello.
If issues with your fingerprint sensor persist, you can try the following:
- Restart your computer and try again.
- Reset your fingerprint data by removing and re-entering your fingerprint.
- Add a different fingerprint to your computer.
- Update the drivers for your fingerprint sensor via the Device Manager.
Can I use face recognition instead of a fingerprint on Windows 11?
Yes, Windows 11 allows you to use facial recognition instead of fingerprint authentication. You can access facial recognition via Windows Hello on the same settings page where fingerprint recognition is found.
Windows 11 also lets you have both fingerprint and facial recognition as sign-in methods to your computer, at the same time.
Benefits of using fingerprint sign-in on your Windows 11 computer
For those curious why it would be a good idea to use fingerprint authentication on Windows 11, here are a few benefits:
Faster login experience
With fingerprint unlock, the most noticeable improvement is speed. Gone are the days when you had to type in your password or PIN, as fingerprint authentication only requires a simple tap or hold — and you’re signed in.
While this is a subtle difference, I personally find this to be an underrated benefit, as it makes logging into your work laptop a much more seamless experience. This is all without sacrificing the overall security of your machine.
Adds extra layer of security
Using fingerprint authentication also adds more security since biometric data cannot be easily copied or stolen, unlike the traditional password or PIN.
To illustrate, let’s say the password you use for your company laptop is the same one as your personal password. Unfortunately, your personal password was included in a massive data breach, thus leaving both your personal and work computers at risk.
Users using fingerprint authentication are less likely to be affected by the same breaches, as it is much harder to steal biometric data than passwords or PINs.
Helps transition to passwordless authentication
For businesses, requiring fingerprint unlock within your organization can aid in transitioning your company to implementing a fully passwordless system. As the name suggests, passwordless authentication refers to any verification method requiring something physical or something unique to a user. This includes biometrics like face recognition and fingerprints, hardware keys or tokens, and one-time passwords, to name a few.
Passwordless authentication is generally seen as more secure than password-based systems and can be impactful for companies with remote workers that use company-provided workstations. While it may require more training, enforcing passwordless authentication can alleviate concerns of targeted attacks against employees and better secure company resources.
If you want to learn more, I encourage you to check out our in-depth feature on passwordless authentication. This guide covers benefits, drawbacks, and popular passwordless authentication solutions to consider.


